3.0 CAMSHAFT SYNC & SENSOR
REPLACEMENT HOW-TO With VIDEO
The Dreaded Chirp of Death...
You can get it and hear it on start up and it will go away...or you can hear it all the time..
If you don't replace the Camshaft Synchronizer and Sensor it will result in engine failure, which means you get to put in another 3.0 or 4.0...or go all out and put in a 5.0. Or sell your truck, scrap it, whatever.
Here is my short write up...and a detailed Video.
(MODS/ADMINS if you wish to format this and edit it, please feel free!)
-----
Caution... Do this project at your own risk... if not done properly it will ruin your engine. This isn't a difficult project, but it is very important that the new camshaft is put in at the same position the old was was at.
Tools Needed:
Wheel Chocks
10mm socket.
5.5mm socket or 7/32.
Ratchet.
6"- 8" Extension.
Preferably in 1/4 drive.
Step Stool
Flashlight or Trouble light. A good light source.
White Paint Marker or Black Sharpie.
Paper Towels or Rags.
Some Engine Motor Oil. Try to use the same type you currently have in your engine.
Estimated Time to do the job:
About 30 minutes!
Parts needed:
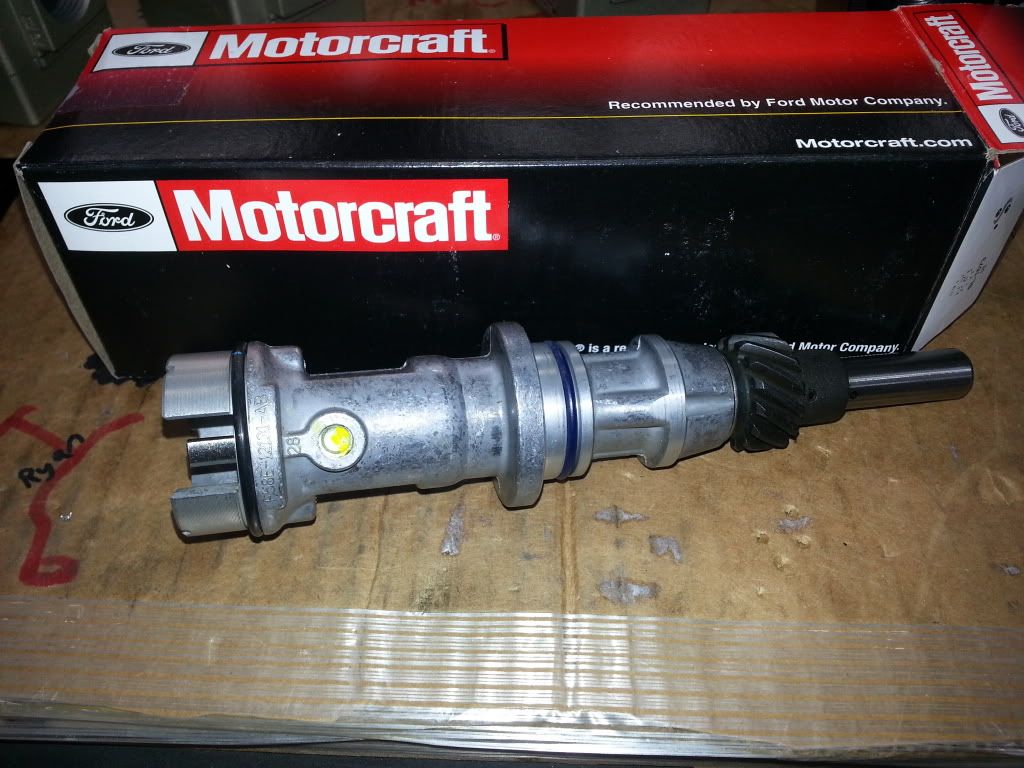
Motorcraft Camshaft Synchronizer (RockAuto.com for $97)
Delphi Camshaft Positioning Sensor (Napa for $39)
Save yourself alot of money by doing it yourself, and not taking it to the dealership and paying $300-$600!
-------
Begin my letting your truck warm up....if possible drive it a few miles... you want the oil to be warm...but not hot!
Park your truck, put wheel chocks under the tires to keep from moving while your working in the engine bay.
Open your Hood..secure it.
Put the step stool in front of the bumper.
Go to your bench and open up your new Motorcraft Camshaft and lube it up with oil... the same oil type you have in your engine.
Open up your new sensor.
Now these items are out and ready.
Grab your 5.5MM or 7/32 Socket with your ratchet and extension. Don't foreget your flashlight, or have your trouble light hanging from the hood.
Use the step stool to climb up in the engine bay.
Sit on the radiator... (hopefully its not HOT, be careful)
Also be careful of air/vac lines and wires and cables all around that area. If you have cruise control, watch out for the cruise control servo throttle cable coming from the servo and across the engine to the throttle.
Locate the Cam Sensor in the back of the motor, in front of the firewall.
Locate the small screws...
Use your 5.5mm or 7/32 socket on an extension and ratchet to remove loosen them up.. these screws will not come out of the plastic housing.
Remove the sensor from the top of the camshaft sync and then disconnect the wire harness.
Now use your marker to mark the position of the tab in the camshaft sync... your new one has to end up at the same position when installed.
Now use your 10mm socket on the ratchet with extension to remove the bolt securing the camshaft sync.
It has been brought up that this bolt may be reverse (lefthand) thread... in my case it WAS NOT. It was still Righty Tighty, Lefty Loosey.
Remove the bolt with the large retaining washer... DO NOT DROP IT or Loose it!
Next go get the New Cam Sync and mark it in the same spot where you marked the old one, where the tab WAS.. the tab will have moved when you pulled the camshaft out!
Now put the tab at that mark, then rotate it a few degrees counter clockwise... when you put it in, it will move clockwise slightly..
Now its time to get back up there and install the new camshaft.
Take your time, put it in and tighten the retaining bolt/washer down..once again the tab will move when u tighten the bolt down. If it is not in the correct position where your mark is, then remove it, and try again.
It may take several attempts! Be patient!
Once you got it correctly in place, get the Sensor, and plug the wire connector into it. Then place it on top of the camshaft...
Now using you 5.5mm or 7/32 socket again, tighten the screws, but DO NOT OVERTIGHTEN, you will crack the plastic sensor housing.
Once the sensor is back in... you should be good to start the truck..
Listen for any odd sounds and any CEL lights...
Clean up your mess and take pride in the work you did and the money you saved by not taking it to a dealership and paying $300-600.
Now take it for a test drive...10 miles or so.. get it up to 60-65 and listen to the engine (have your radio off!). Bring it back let it cool down. Once its cool, open the hood and climb back in and double check the camshaft sync retaining bolt and washer....also check around it for oil leaks.
I may add pictures to this soon..but here is a complete detailed video.
[ame]http://www.youtube.com/watch?v=dcZ-D0OYnVg[/ame]
REPLACEMENT HOW-TO With VIDEO
The Dreaded Chirp of Death...
You can get it and hear it on start up and it will go away...or you can hear it all the time..
If you don't replace the Camshaft Synchronizer and Sensor it will result in engine failure, which means you get to put in another 3.0 or 4.0...or go all out and put in a 5.0. Or sell your truck, scrap it, whatever.
Here is my short write up...and a detailed Video.
(MODS/ADMINS if you wish to format this and edit it, please feel free!)
-----
Caution... Do this project at your own risk... if not done properly it will ruin your engine. This isn't a difficult project, but it is very important that the new camshaft is put in at the same position the old was was at.
Tools Needed:
Wheel Chocks
10mm socket.
5.5mm socket or 7/32.
Ratchet.
6"- 8" Extension.
Preferably in 1/4 drive.
Step Stool
Flashlight or Trouble light. A good light source.
White Paint Marker or Black Sharpie.
Paper Towels or Rags.
Some Engine Motor Oil. Try to use the same type you currently have in your engine.
Estimated Time to do the job:
About 30 minutes!
Parts needed:
Motorcraft Camshaft Synchronizer (RockAuto.com for $97)
Delphi Camshaft Positioning Sensor (Napa for $39)
Save yourself alot of money by doing it yourself, and not taking it to the dealership and paying $300-$600!
-------
Begin my letting your truck warm up....if possible drive it a few miles... you want the oil to be warm...but not hot!
Park your truck, put wheel chocks under the tires to keep from moving while your working in the engine bay.
Open your Hood..secure it.
Put the step stool in front of the bumper.
Go to your bench and open up your new Motorcraft Camshaft and lube it up with oil... the same oil type you have in your engine.
Open up your new sensor.
Now these items are out and ready.
Grab your 5.5MM or 7/32 Socket with your ratchet and extension. Don't foreget your flashlight, or have your trouble light hanging from the hood.
Use the step stool to climb up in the engine bay.
Sit on the radiator... (hopefully its not HOT, be careful)
Also be careful of air/vac lines and wires and cables all around that area. If you have cruise control, watch out for the cruise control servo throttle cable coming from the servo and across the engine to the throttle.
Locate the Cam Sensor in the back of the motor, in front of the firewall.
Locate the small screws...
Use your 5.5mm or 7/32 socket on an extension and ratchet to remove loosen them up.. these screws will not come out of the plastic housing.
Remove the sensor from the top of the camshaft sync and then disconnect the wire harness.
Now use your marker to mark the position of the tab in the camshaft sync... your new one has to end up at the same position when installed.
Now use your 10mm socket on the ratchet with extension to remove the bolt securing the camshaft sync.
It has been brought up that this bolt may be reverse (lefthand) thread... in my case it WAS NOT. It was still Righty Tighty, Lefty Loosey.
Remove the bolt with the large retaining washer... DO NOT DROP IT or Loose it!
Next go get the New Cam Sync and mark it in the same spot where you marked the old one, where the tab WAS.. the tab will have moved when you pulled the camshaft out!
Now put the tab at that mark, then rotate it a few degrees counter clockwise... when you put it in, it will move clockwise slightly..
Now its time to get back up there and install the new camshaft.
Take your time, put it in and tighten the retaining bolt/washer down..once again the tab will move when u tighten the bolt down. If it is not in the correct position where your mark is, then remove it, and try again.
It may take several attempts! Be patient!
Once you got it correctly in place, get the Sensor, and plug the wire connector into it. Then place it on top of the camshaft...
Now using you 5.5mm or 7/32 socket again, tighten the screws, but DO NOT OVERTIGHTEN, you will crack the plastic sensor housing.
Once the sensor is back in... you should be good to start the truck..
Listen for any odd sounds and any CEL lights...
Clean up your mess and take pride in the work you did and the money you saved by not taking it to a dealership and paying $300-600.
Now take it for a test drive...10 miles or so.. get it up to 60-65 and listen to the engine (have your radio off!). Bring it back let it cool down. Once its cool, open the hood and climb back in and double check the camshaft sync retaining bolt and washer....also check around it for oil leaks.
I may add pictures to this soon..but here is a complete detailed video.
[ame]http://www.youtube.com/watch?v=dcZ-D0OYnVg[/ame]