Hooligan
Rangerholic!!
This is a HOW TO for installing an Explorer auto dim mirror. This mirror not only automatically dims from the car headlights behind you but it will turn on/off your headlight from day/night and it also has a timer on the bottom for your lights to be left on for a certain period of time when you step out of your vehicle after it is turned off. You do not need an OHC for this MOD, these are instructions for a truck with an OHC, only difference is the placement of one wire as you will see in the following.
Tools / items needed for installation:
YOU MUST DISCONNECT THE BATTERY BEFORE DOING ANYTHING!
First step:
Remove your old factory rear view mirror by placing a flat head screw driver underneath and lift GENTLY! The mirror will slide up and you can remove it from the windshield mount. Then mount your auto dim mirror to the mount bracket, adding the wire hide (covers the wires going from the mirror into the headliner). *NOTE: some of the plastic wire hides may have to be cut due to distance from the mirror to the headliner. I used a dremel with a cut off blade to cut it and file it even and smooth*
Second step:
Remove knee plate underneath steering wheel with your socket set, also removing hood latch. Then remove metal plate behind the knee plate. Also remove the dash bezel, unplugging the headlight switch plug and the interior light plug. Tuck away the interior light plug into the vent so it does not get in the way or mistakenly cut when splicing the headlight wires. Also remove the "A" pillar or "B" pillar trim (only 1 pillar needs to be removed, just depends on where you run your wires to) along with the kick plate underneath.
Take a look under the console for a good area to adhere the relays to so you know how much wire to run from your headlight switch to the relays
Third step:
(wires)
Pull headlight plug out for splicing.
WIRES COMING FROM MIRROR ITSELF:
1) White/pink wire (may look white/purple) This wire triggers the relay
- add more wire by crimping a butt connector, run it under the dash to pedals, when you get the wire to the pedals, add another butt connector, and splice two wires into the open end of the butt connector for the relays leave extra wire too and LABEL IT
2) Red/yellow wire (may look red/white) (12v constant,always hot)
- Use a wire tap, and tap it into the grey/yellow wire coming from OHC. If you do not have an OHC you can simply tap this wire into the green/orange wire from your dome light using 1 T-tap
3) There is a black/pink wire, Cut it and tape it off, you do not need it, its just a wire that auto dims the mirror when the truck is in reverse. I did not use this wire therefore I can not tell you where it goes because that function was unnecessary for me.
4) Solid black wire - (ground wire) Can be tapped into the ground of the OHC or add wire with a crimp on "O" ring connect and attach it to another ground found underneath the dash
Fourth Step:
HEADLIGHT SWITCH CUTTING AND SPLICING:
**There are some identical wires in this bundle, you will be splicing into the thick wires only, and YOU CAN NOT USE WIRE TAPS FOR THESE, YOU MUST USE BUTT CONNECTORS**
The "Y" splices should be made in the back of the butt connectors so they run behind your dash so it does not interfere with the main wire when pushed back in upon replacing the bezel.
1) Blue/orange wire (thick) cut it, splice it back together adding a "Y" connection at the splice, run the wire through dash down to the pedals, leave extra wire and LABEL IT!
2) Red/yellow wire (thick) cut and splice it back together adding a "Y" connection at the splice, run the wire through the dash down to the pedals, leave extra wire and LABEL IT!
3) Brown - Now they say brown, but it looked like a thick dark grey wire to me! Cut and splice it back together adding a "Y" connection at the splice, run the wire though the dash, down to the pedals, leave extra wire and LABEL IT
4) Tan/white wire - cut it, splice it back together adding a "Y" connection at the splice, run the wire though the dash down to the pedals, leave extra wire and LABEL IT

Fifth Step:
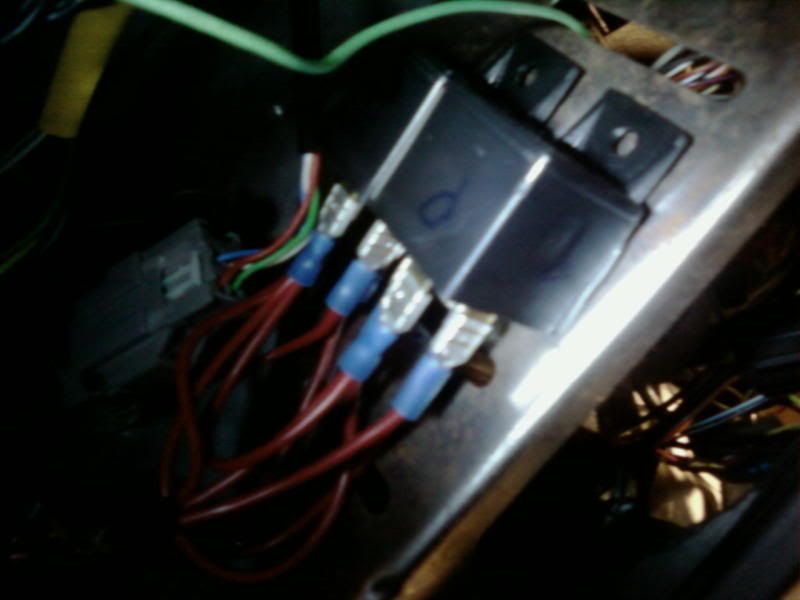
BUILDING THE RELAY WITH THE WIRES YOU HAVE LABELED:
First figure out where you will mount the relays under the dash, cut the wires to length, add quick disconnects to all wires you just ran MAKE SURE THE WIRES ARE STILL LABELED! Mark one relay headlamps, mark the other parking lamps, a simple "H" and "P" does the trick.
NOTE: Attach the relays together using double sided tape, making sure the relays are positioned the same way for easy mounting
1) The "Y" connection for the white/ pink wire attach one wire to terminal 85 of of "H" relay, attach the second wire to terminal 85 of the "P" relay.
2) Crimp 2 wires into a quick connect, plug that into terminal 86 of "H" relay, now you are left with 2 wires hanging from that connection. Add quick disconnect to one. Now attach one of those wires to terminal 86 of "P" relay. Then attach the other wire and the tan/white wire into a quick disconnect, then plug it into terminal 30 of the "p" relay
3) Brown wire - attaches to terminal 87 of the "P" relay
4) Blue/orange wire - attaches to terminal 87 of the "H" relay
5) Red/yellow wire - attaches to terminal 30 of the "H" relay
Relay wiring diagram

Sixth Step:
Once you complete the wiring and all steps are checked to ensure proper connections are made, reconnect your battery, and plug in your headlight switch.
FIRST - start your truck, then turn on your headlights to make sure all connections are good and working properly, then turn off your headlights.
SECOND - Test your auto headlights by putting black tape over the sensor on the back of the mirror and to make sure the sensor works, cover the windshield with a blanket. Once the sensors are covered, your headlights and all your dash lights will turn on by themselves. If they do not, check your splicing and connections according to the above wiring steps.
Once you have established everything works properly, using the double sided tape again, mount your relays to the place you designated for them and MAKE SURE ALL CONNECTIONS ARE IN TACT. Then wrap all butt connections in electrical tape(optional)
Hide your wiring down the "A" or "B" pillar (whichever you ran the wires)
plug in your interior switch plug and put together your dash bezel, 2 knee plates, pillar trim and kick plates. Remove the blanket from the windshield and the black tape covering the sensor as well.
At the bottom of your mirror there is a delay slide which is the timer for your headlights to remain on once you turn your truck off. Set this timer at your preference
Tools / items needed for installation:
- Wire cutters and crimpers
- 18 guage wire (I used 1 roll bought from Walmart)
- crimp on butt connectors
- crimp on quick disconnects
- Wire taps
- double sided tape
- 2 SPST 30 amp relays (terminals marked 85,86,87 & 30)
- Socket set
- Electrical tape
- Painters tape (optional but recommended to label wires)
- Flathead screwdriver
- Dremel (optional)
YOU MUST DISCONNECT THE BATTERY BEFORE DOING ANYTHING!
First step:
Remove your old factory rear view mirror by placing a flat head screw driver underneath and lift GENTLY! The mirror will slide up and you can remove it from the windshield mount. Then mount your auto dim mirror to the mount bracket, adding the wire hide (covers the wires going from the mirror into the headliner). *NOTE: some of the plastic wire hides may have to be cut due to distance from the mirror to the headliner. I used a dremel with a cut off blade to cut it and file it even and smooth*
Second step:
Remove knee plate underneath steering wheel with your socket set, also removing hood latch. Then remove metal plate behind the knee plate. Also remove the dash bezel, unplugging the headlight switch plug and the interior light plug. Tuck away the interior light plug into the vent so it does not get in the way or mistakenly cut when splicing the headlight wires. Also remove the "A" pillar or "B" pillar trim (only 1 pillar needs to be removed, just depends on where you run your wires to) along with the kick plate underneath.
Take a look under the console for a good area to adhere the relays to so you know how much wire to run from your headlight switch to the relays
Third step:
(wires)
Pull headlight plug out for splicing.
WIRES COMING FROM MIRROR ITSELF:
1) White/pink wire (may look white/purple) This wire triggers the relay
- add more wire by crimping a butt connector, run it under the dash to pedals, when you get the wire to the pedals, add another butt connector, and splice two wires into the open end of the butt connector for the relays leave extra wire too and LABEL IT
2) Red/yellow wire (may look red/white) (12v constant,always hot)
- Use a wire tap, and tap it into the grey/yellow wire coming from OHC. If you do not have an OHC you can simply tap this wire into the green/orange wire from your dome light using 1 T-tap
3) There is a black/pink wire, Cut it and tape it off, you do not need it, its just a wire that auto dims the mirror when the truck is in reverse. I did not use this wire therefore I can not tell you where it goes because that function was unnecessary for me.
4) Solid black wire - (ground wire) Can be tapped into the ground of the OHC or add wire with a crimp on "O" ring connect and attach it to another ground found underneath the dash
Fourth Step:
HEADLIGHT SWITCH CUTTING AND SPLICING:
**There are some identical wires in this bundle, you will be splicing into the thick wires only, and YOU CAN NOT USE WIRE TAPS FOR THESE, YOU MUST USE BUTT CONNECTORS**
The "Y" splices should be made in the back of the butt connectors so they run behind your dash so it does not interfere with the main wire when pushed back in upon replacing the bezel.
1) Blue/orange wire (thick) cut it, splice it back together adding a "Y" connection at the splice, run the wire through dash down to the pedals, leave extra wire and LABEL IT!
2) Red/yellow wire (thick) cut and splice it back together adding a "Y" connection at the splice, run the wire through the dash down to the pedals, leave extra wire and LABEL IT!
3) Brown - Now they say brown, but it looked like a thick dark grey wire to me! Cut and splice it back together adding a "Y" connection at the splice, run the wire though the dash, down to the pedals, leave extra wire and LABEL IT
4) Tan/white wire - cut it, splice it back together adding a "Y" connection at the splice, run the wire though the dash down to the pedals, leave extra wire and LABEL IT
Fifth Step:
BUILDING THE RELAY WITH THE WIRES YOU HAVE LABELED:
First figure out where you will mount the relays under the dash, cut the wires to length, add quick disconnects to all wires you just ran MAKE SURE THE WIRES ARE STILL LABELED! Mark one relay headlamps, mark the other parking lamps, a simple "H" and "P" does the trick.
NOTE: Attach the relays together using double sided tape, making sure the relays are positioned the same way for easy mounting
1) The "Y" connection for the white/ pink wire attach one wire to terminal 85 of of "H" relay, attach the second wire to terminal 85 of the "P" relay.
2) Crimp 2 wires into a quick connect, plug that into terminal 86 of "H" relay, now you are left with 2 wires hanging from that connection. Add quick disconnect to one. Now attach one of those wires to terminal 86 of "P" relay. Then attach the other wire and the tan/white wire into a quick disconnect, then plug it into terminal 30 of the "p" relay
3) Brown wire - attaches to terminal 87 of the "P" relay
4) Blue/orange wire - attaches to terminal 87 of the "H" relay
5) Red/yellow wire - attaches to terminal 30 of the "H" relay
Relay wiring diagram
Sixth Step:
Once you complete the wiring and all steps are checked to ensure proper connections are made, reconnect your battery, and plug in your headlight switch.
FIRST - start your truck, then turn on your headlights to make sure all connections are good and working properly, then turn off your headlights.
SECOND - Test your auto headlights by putting black tape over the sensor on the back of the mirror and to make sure the sensor works, cover the windshield with a blanket. Once the sensors are covered, your headlights and all your dash lights will turn on by themselves. If they do not, check your splicing and connections according to the above wiring steps.
Once you have established everything works properly, using the double sided tape again, mount your relays to the place you designated for them and MAKE SURE ALL CONNECTIONS ARE IN TACT. Then wrap all butt connections in electrical tape(optional)
Hide your wiring down the "A" or "B" pillar (whichever you ran the wires)
plug in your interior switch plug and put together your dash bezel, 2 knee plates, pillar trim and kick plates. Remove the blanket from the windshield and the black tape covering the sensor as well.
At the bottom of your mirror there is a delay slide which is the timer for your headlights to remain on once you turn your truck off. Set this timer at your preference
Last edited: